O Gauge Modelling on the GWR
A personal Journey
PECO Electrics
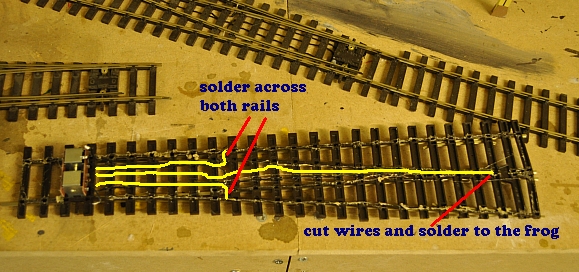
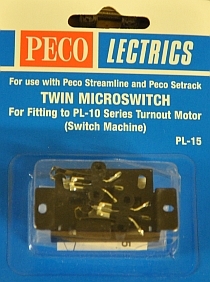
Peco points come 'ready to use'. Except that they can give a lot of bother if you just use them 'out of the box'. First I fix a turnout motor to the point, (PL-10) and then rewire the point so that the frog and blades always are powered and give the correct polarity. This requires cutting the existing wiring and replacing it with 3 alternative connections, (as shown here in yellow).These need to be 'switched' though and I used to use the PECO point - Accessory Switch, (PL-13), that fitted onto the motor body and worked when the point blades moved over. Unfortunately theses switches are not that good and often result in the motor failing to switch the blades over. A much better option, though more expensive, is shown below.
 |
I have replaced all the sliders with the double micro switches, (PL-15), as they take little force to work them. I cut off the securing tabs and carefully clip the micro switch body to the point motor. I cut a hole just big enough to allow the motor and switches to sit in the baseboard, (this makes it easy to remove or replace the point and its bits later if need be). You can see how I modify the turnout with the three wires, (in white here and yellow in the diagram above), and as described above that are soldered to the micro switch tags. The beauty of this is that the second micro switch can be used for panel light activation or signal control.
  |
One tip here: The motors can be a little stiff in operation and don't always 'throw' correctly in each direction. You can solve this by using a little thin oil on the shaft that slides through the coils.
Its also important to consider using a CDU, (Capacitor Discharge Unit), or a number of them to add power to the turnout switching, (I have 4 distributed around the layout, one in each section). There is more in formation on the point control page, click here to access it.