O Gauge Modelling on the GWR
A personal Journey
Hornby Dublo 3 Rail layout
This is a slight distraction from my O gauge layout, but it is something I've wanted to put right for some long time. To my surprise All the Hornby Dublo 3 rail stuff I wanted was available on eBay and other related sites on the internet.
Not being a purest regarding all things HD3 I looked into creating a range of non Hornby buildings using Superquick and wills kits and now I turned my hand to Scalescenes for the reasonably priced kits they produce to add to the layout. Click here to see what this transpired into.
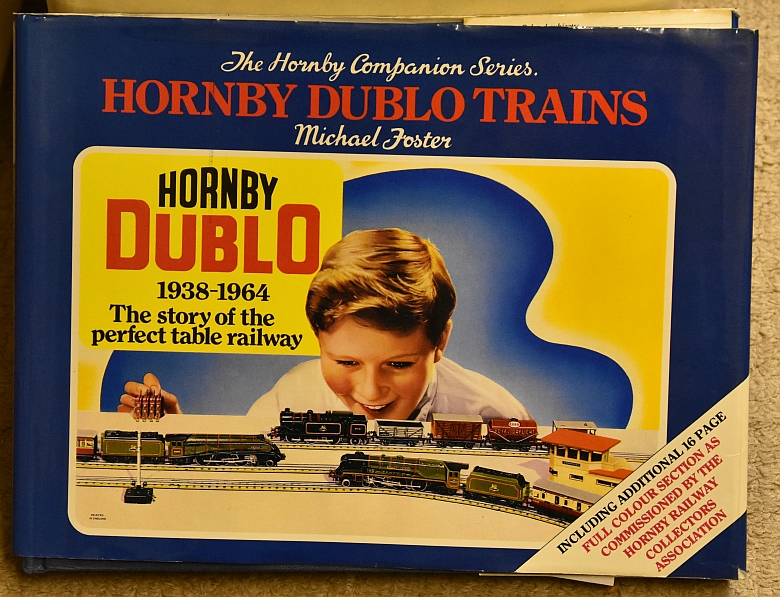 |
Perhaps the biggest and most costliest mistake I made was purchasing the Hornby Dublo Trains book by Michael Foster: The story of the perfect table railway. His very personal view was very helpful to me in obtaining as many examples of the HD3R world as possible that I had as a nipper and I am still on the lookout for the odd wagon and loco. It should come with a health warning, (but I have found it a great help so thanks Mike). |
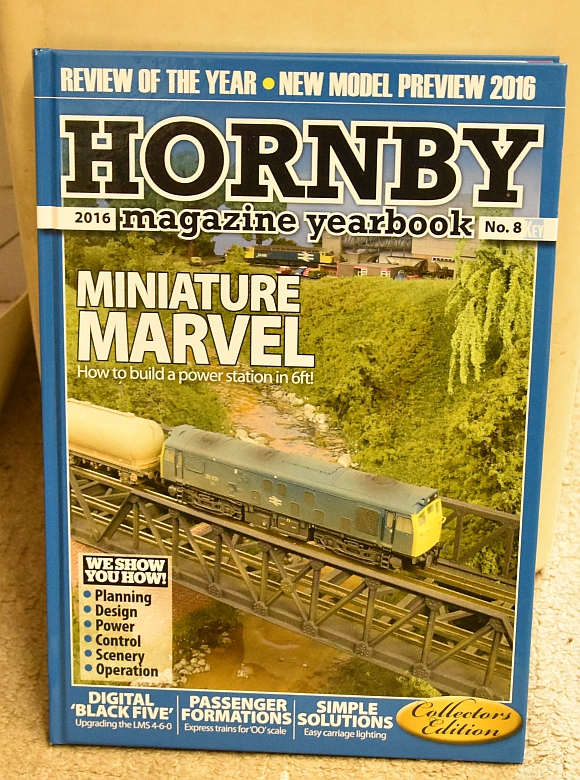
| Also, I have recently tracked down the first seven copies of the Hornby magazine yearbook. Sometimes you come across something that although aimed at a particular market it strikes home in a number of related areas. A book that brings together all the best of a particular hobby and covers a number of areas in not just 00 but most gauges and makes and models and splashes this all over with a range of techniques together with large excellent photographs has got to be good. In my opinion these yearbooks certainly are this and I would highly recommend them to all. There's more info on them in my library section |
 |
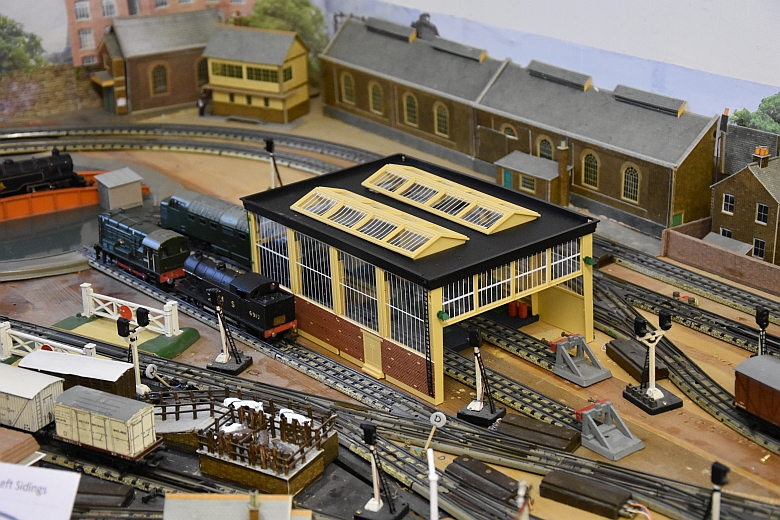
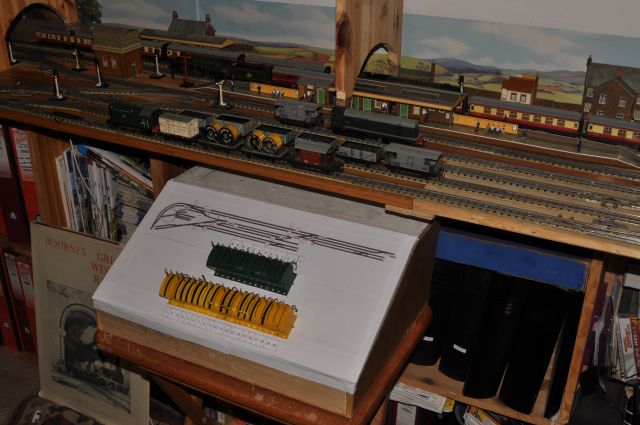
Latest acquisition in building kits from Scalescenes, an engine shed and coaling stage. Click here to see how they progress.
Latest acquisition in rolling stock:
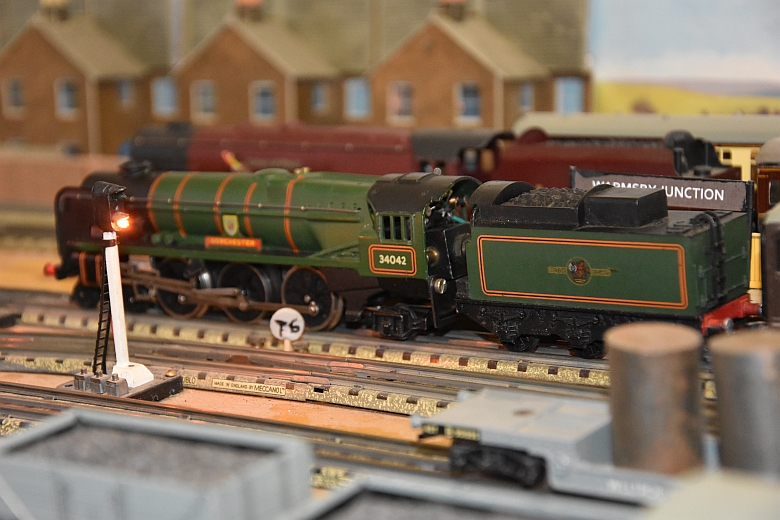
The West Country Dorchester Loco, (January 2018). waited even longer than for the previous loco for this one. Still in pristine condition. The magnet as with all the older locos is somewhat below power and has been enhanced by me with a neo-magnet. There is enough room inside the cab to add a magnet onto the existing ring magnet and this has provided increased power.
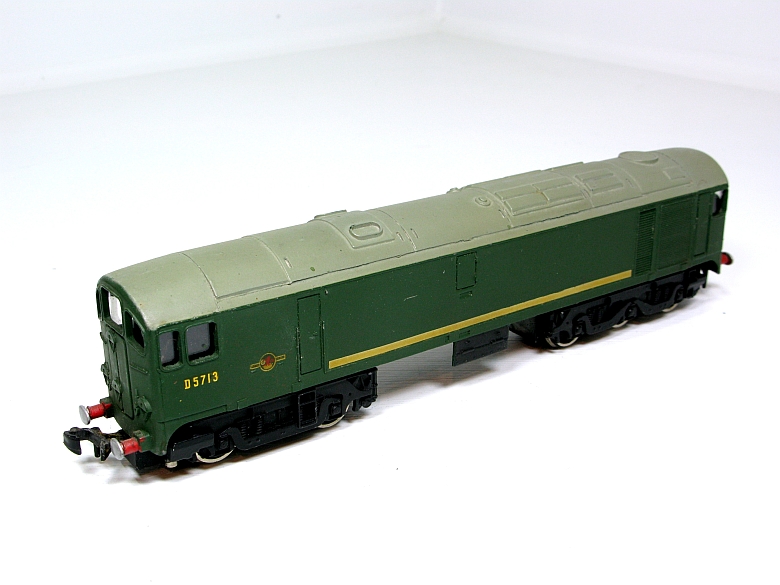
Just acquired the CO-BO from ebay. I have waited for a couple of years for this one and it takes pride of place along with my other diesels.
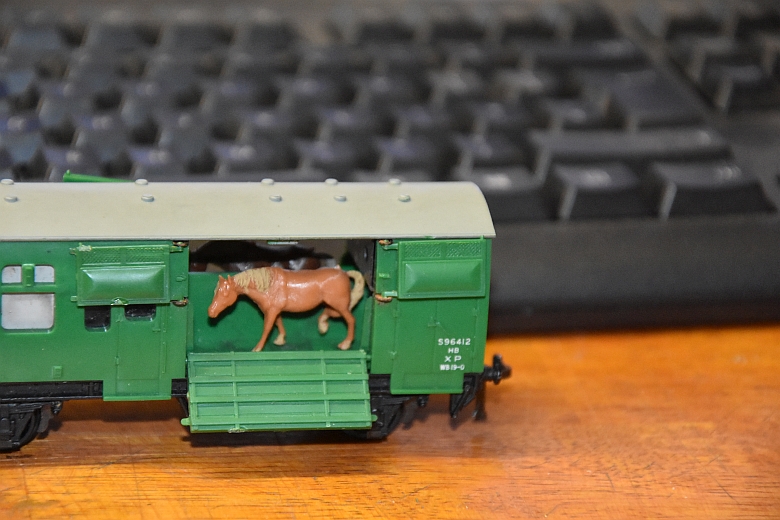
SR Horsebox, sadly without a horse but with an almost complete box. I have since added two ponies from the Modelscene accessories range and a little selotape to keep the doors as yet intact shut closed and free from possible collision damage!
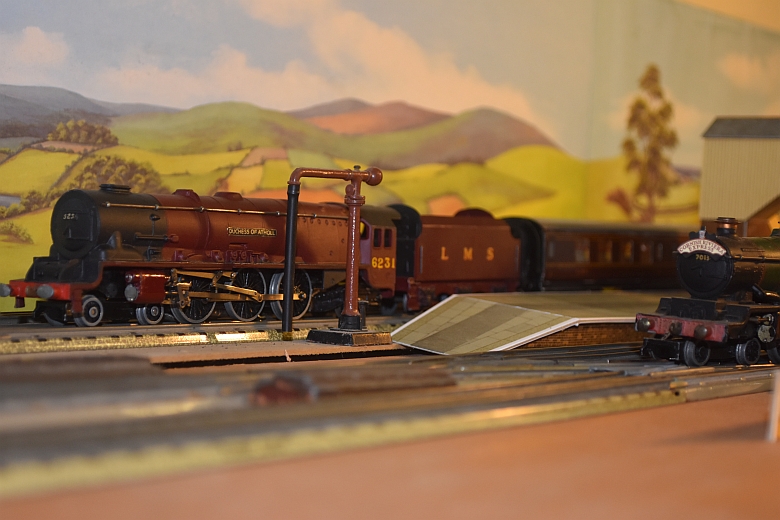
Latest acquisition to the loco stock, Duchess of Athol
Replacing colour light signals with LEDs a simple replacement process. Click here for my notes.
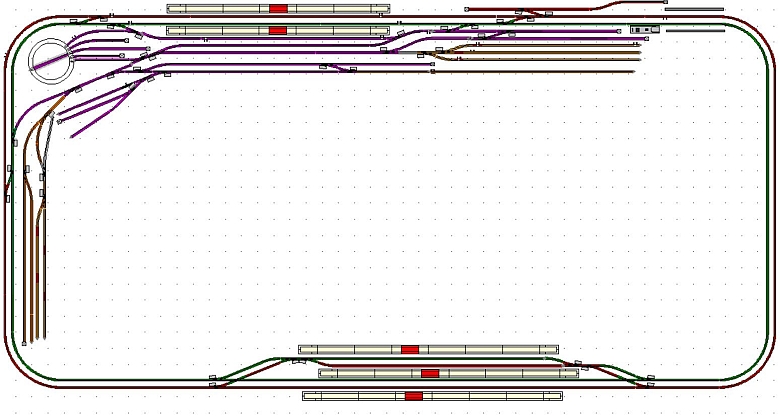
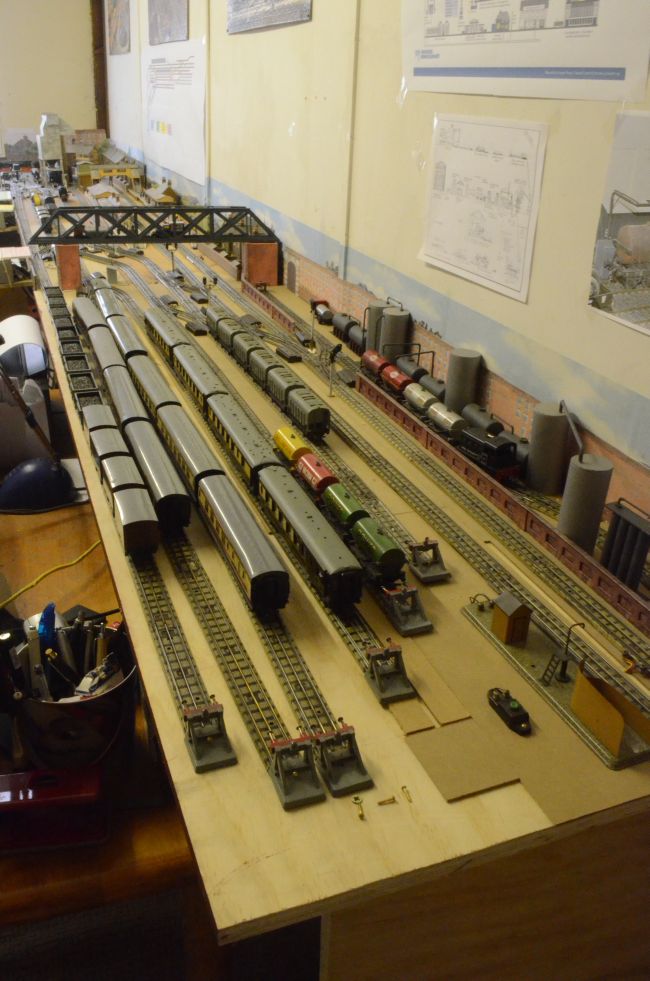
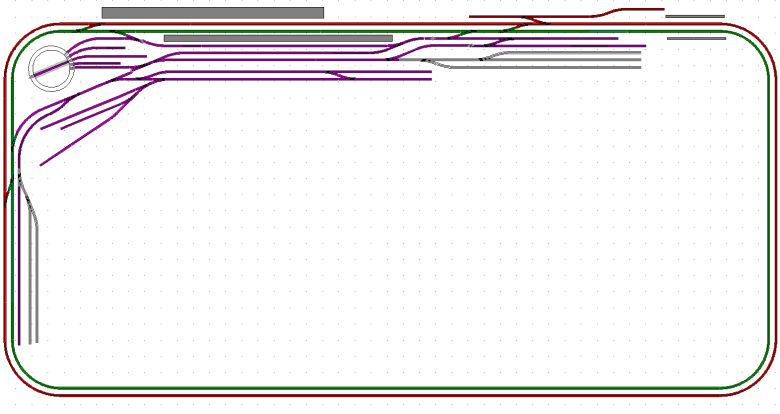
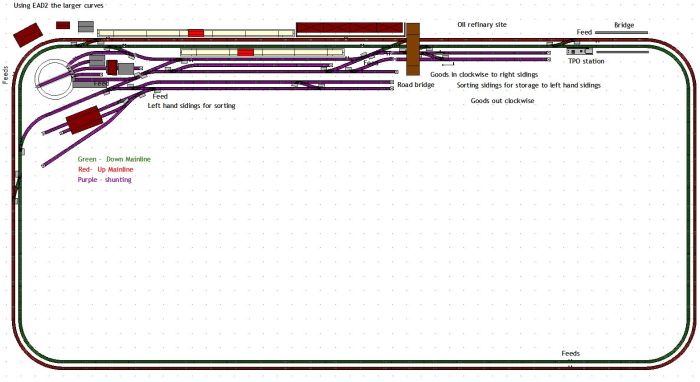
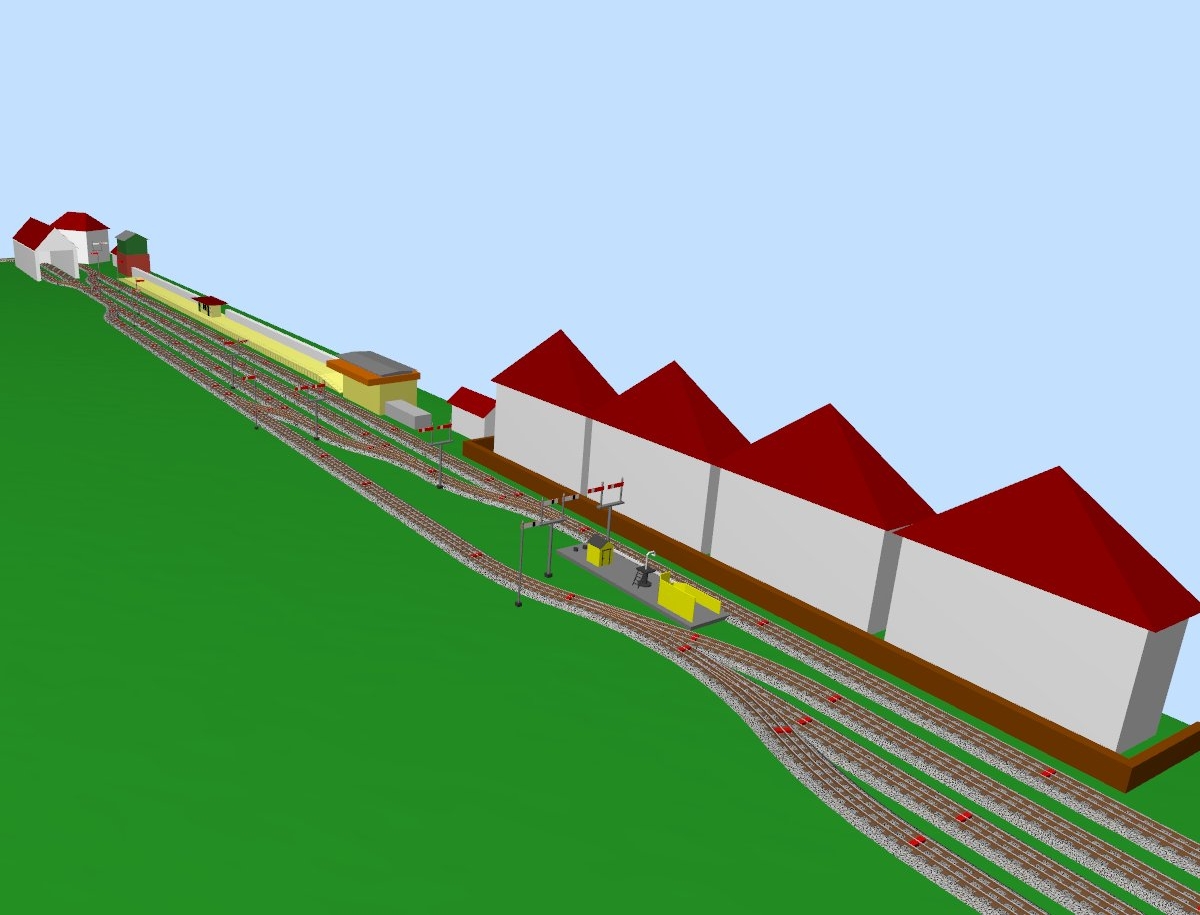
To make the run around more interesting I've set up a new mainline station with two extra platform sidings. Here is the latest plan:-
Also a couple of early photos of it here, (and click here to see how it progresses).
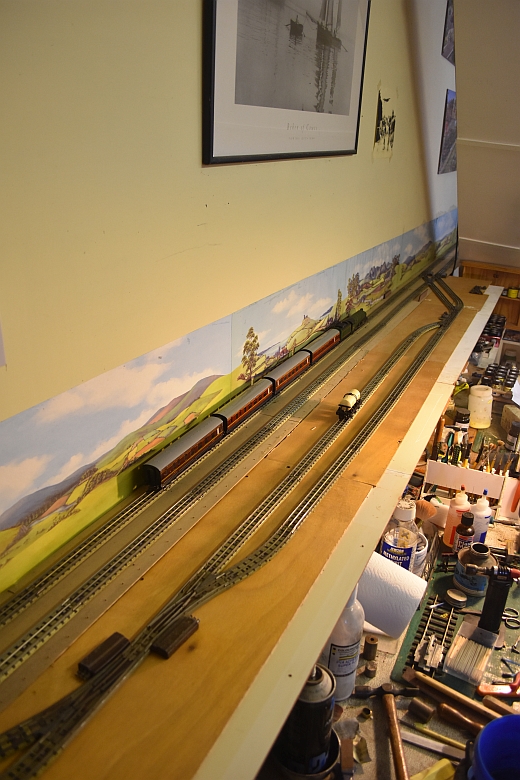
To see the development of this layout you really need to start at the bottom and work up! It has changed a lot over time and bits of baseboards have been added on as ideas have developed. One thing is for sure, there never is enough room! The latest development is a diesel maintenance depot as shown here:
I was lucky to find a complete unused one still in its original box and it makes a fine addition to the layout.
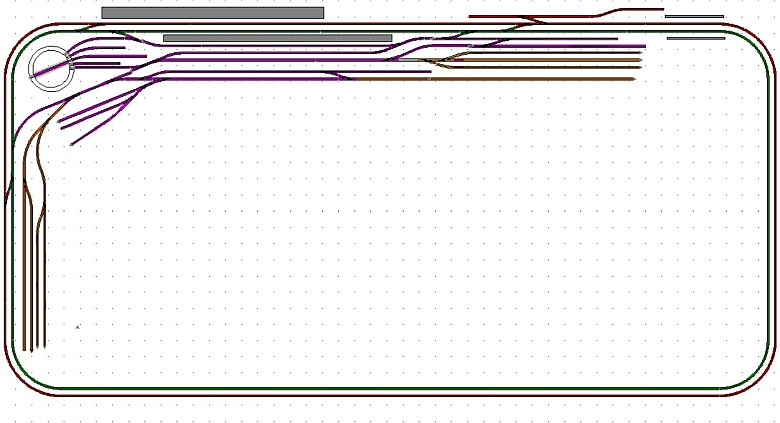
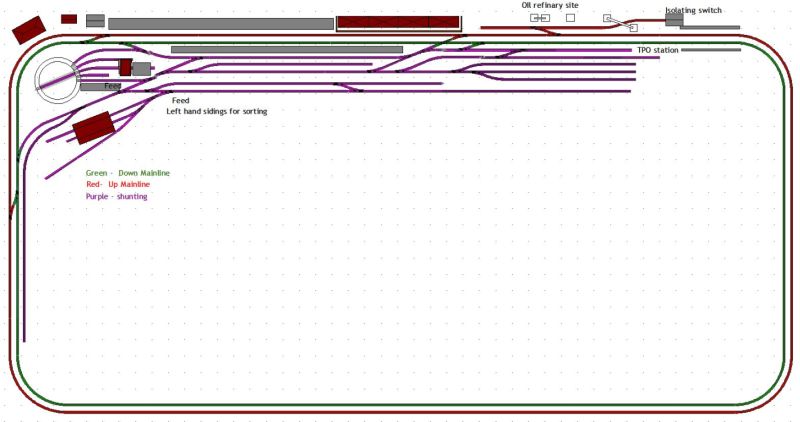
Here is the latest layout plan. Showing the changes to the storage sidings down the left-hand side and on the right where the three junction signal project is taking place.
Here is a video of the completed switch arrangement;
Here is the latest layout plan. Showing the changes to the storage sidings down the left-hand side and on the right where the three junction signal project is taking place.
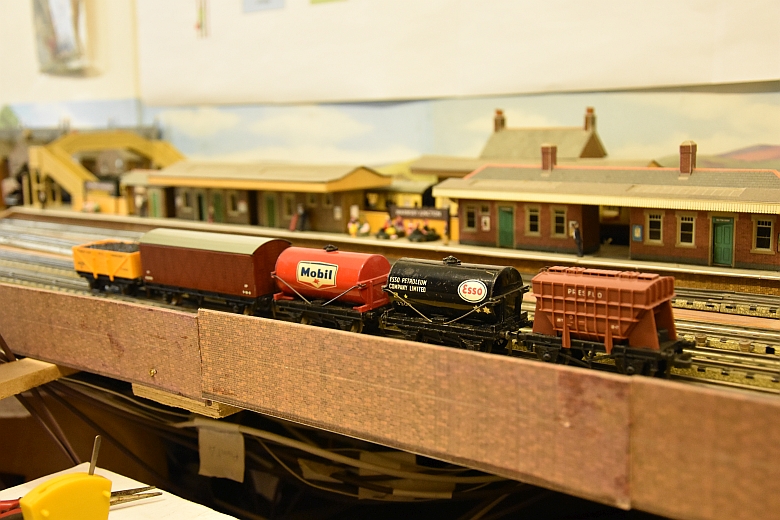
A couple more trucks have been obtained to add to the collection.
I've created a gallery of all the rolling stock Click Here to view it.
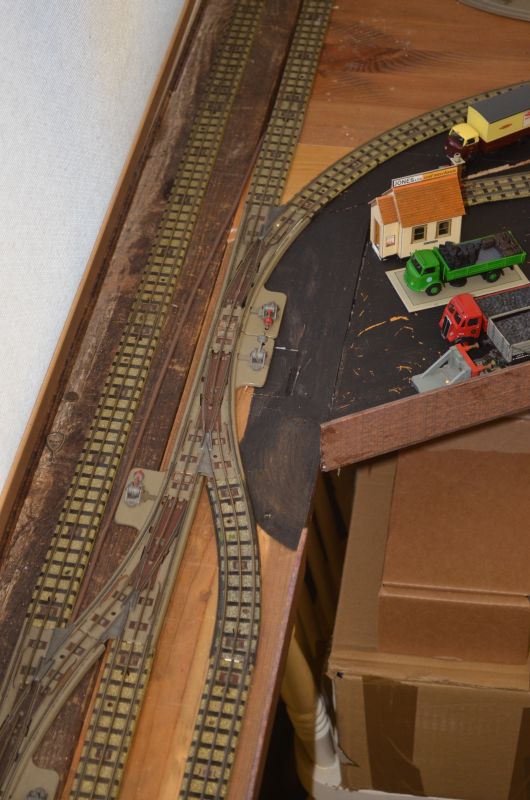
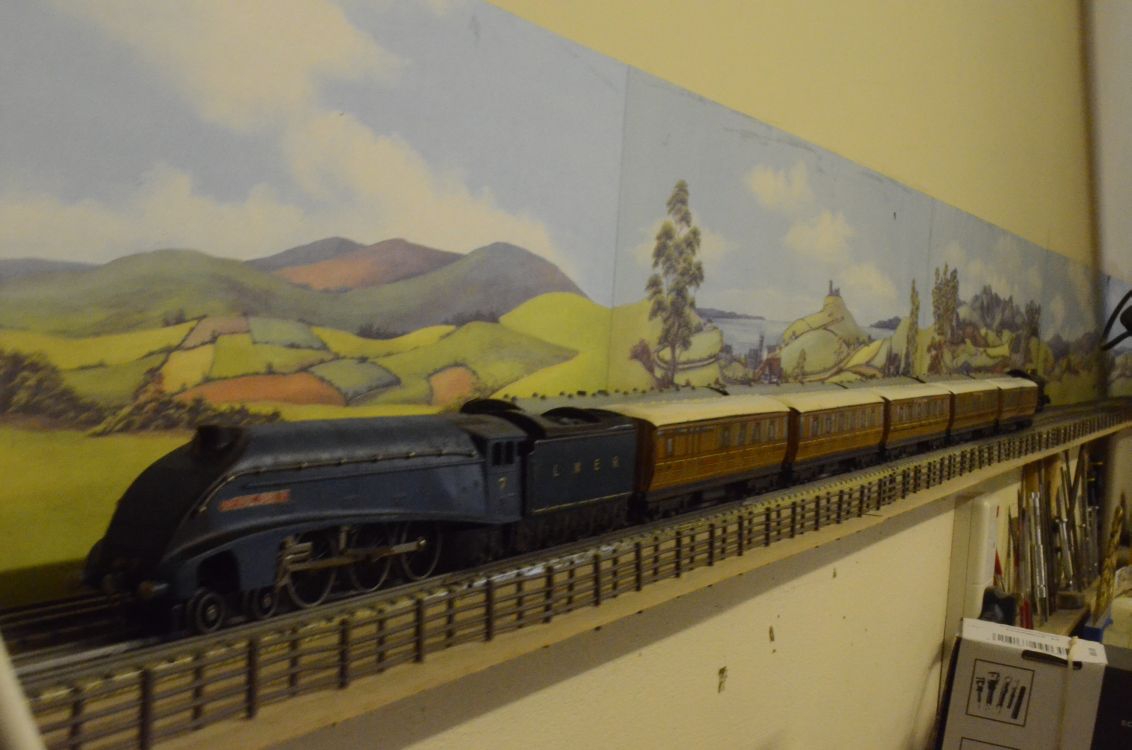
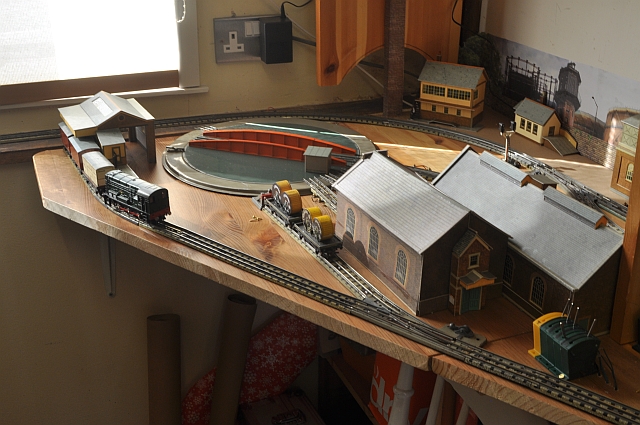
In spite of having enough to fill more than the space I have available I now have replaced part of the boards for the base and added several more storage lines. Which of course has meant that I needed to complete the rolling stock and loco list with Sir Nigel Gresley and a rake of 5 tinplate LNER coaches. Luckily I have been able to acquire these at a modest price from ebay. Also I have found that the PECO flexible fencing is a boon for giving added protection as shown in the image below. its a long drop from here to the floor!
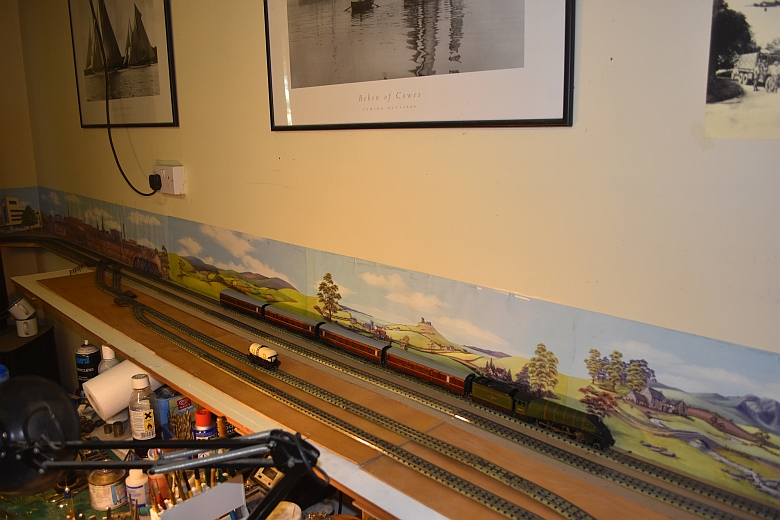
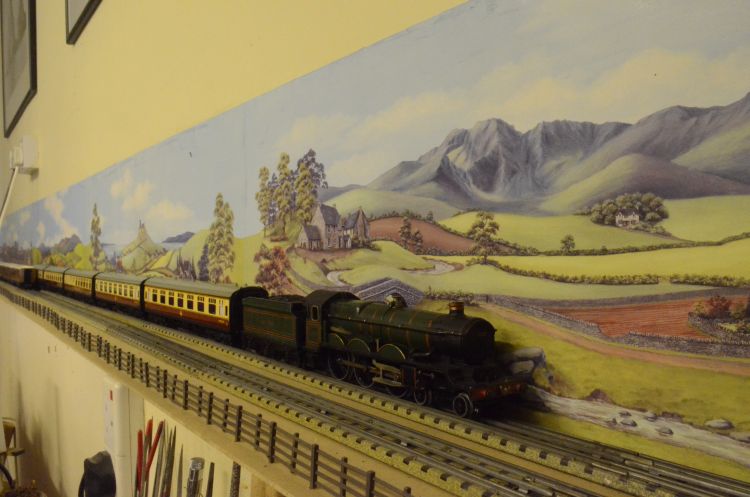
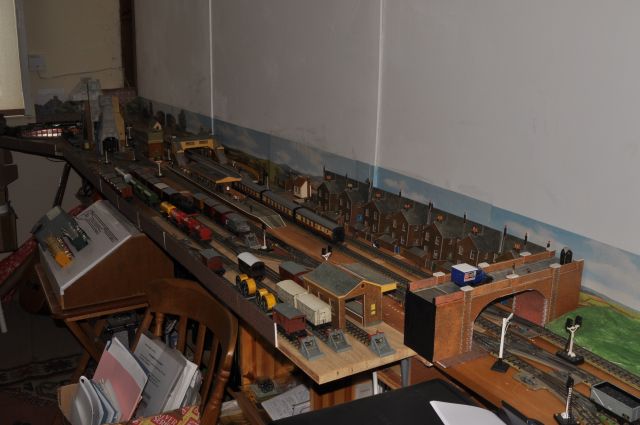
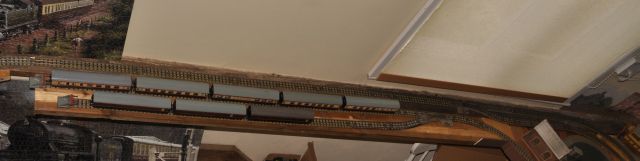
If you look below you will see that what started out as a bookshelf top railway quickly grew to much more. A double mainline track round the office walls and numerous extensions and additions to the sidings, (literally screw a bit of wood on here add a section there!). So one part had to be replaced as shown below. Compare this to its predecessor below. I can now arrange rakes of coaches and have them moved to platform 3 ready for mainline work with particular locos. Did I mention I have also acquired Bristol Castle and a rake of 5 GWR coaches including the rare restaurant coach with the roundal.
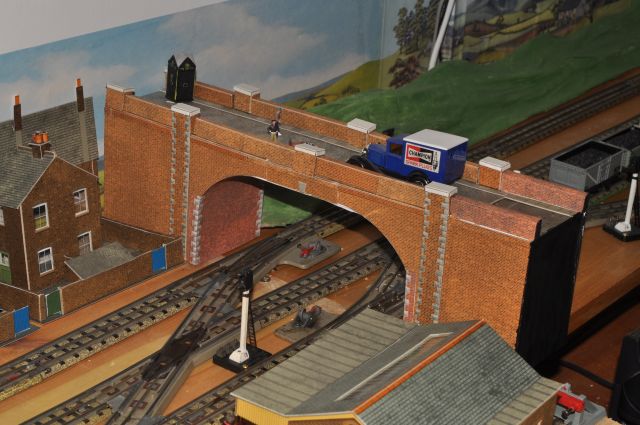
Here is the siding extension and new baseboard, (all one piece). A new bridge now spans the tracks as well. made from Limewood strip. The old bridge has been moved over to a corner.
Not content with the extra sidings here I've also put in two extra sidings down the other side of the mainline where I had my shunting spur for the goods yard, (all thanks to Geoff who donated said rails, points a level crossing, footbridge and signalbox)! This really has to STOP now! Oh did I mention that a breakdown crane with coach and packing van are on the horizon?
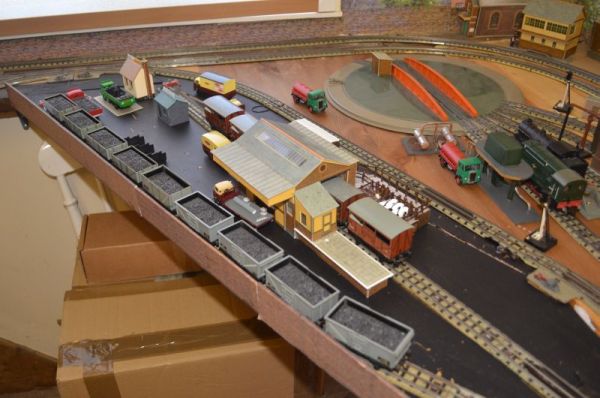
You may also spot the Dublo Dinky cars in the foreground of the above picture and a Base models truck.
Latest projects in this area, (I've devoted separate pages as the areas are forever growing) and the 'What to do...' will be especially useful to like me who find themselves tied up in knots after extending and upgrading their railway:
What to do when events overtake your original design
Electrification of points and control of signals
Developing a control panel for the railway
Having started at the age of 5 or 6 with the Duchess of Montrose set and then the 0-6-2 Goods set it slowly developed onto a board with double track loops and a few manual points and hand operated signals.
Click any image to see an enlarged view
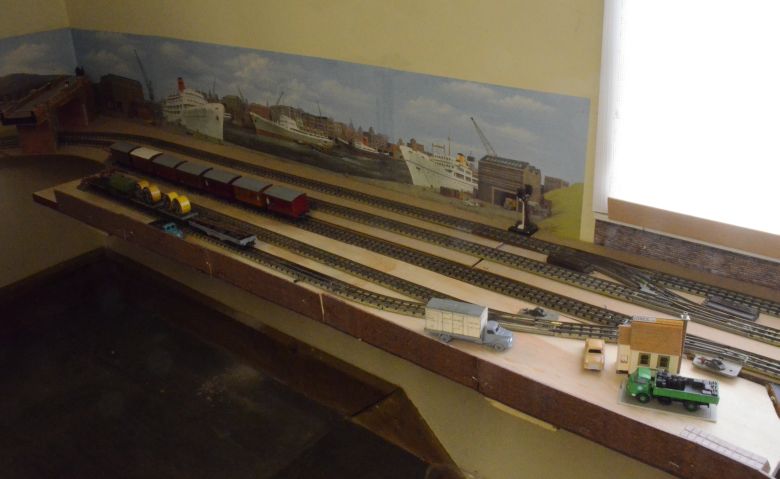
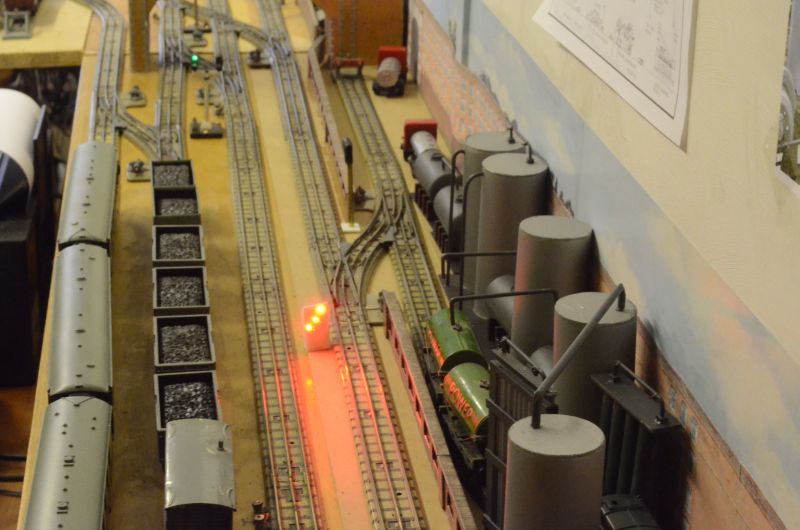
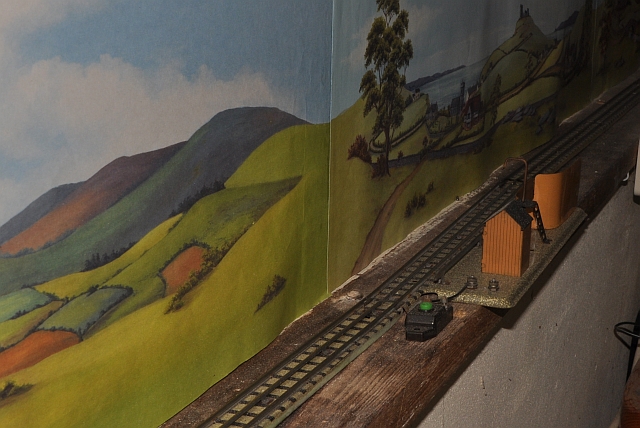
Here is a view of the oil refinery with access to it via the main up. The ground signal is a homemade affair as shown here:
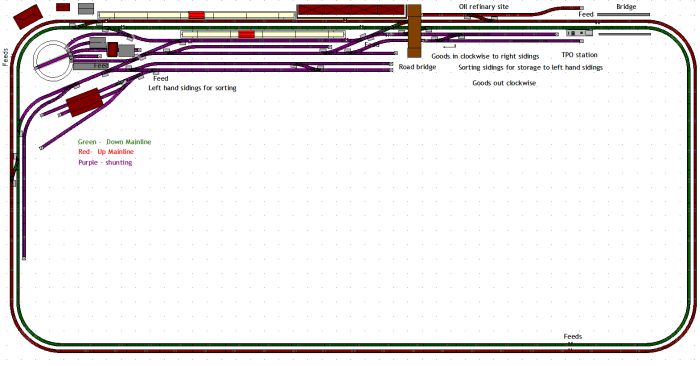
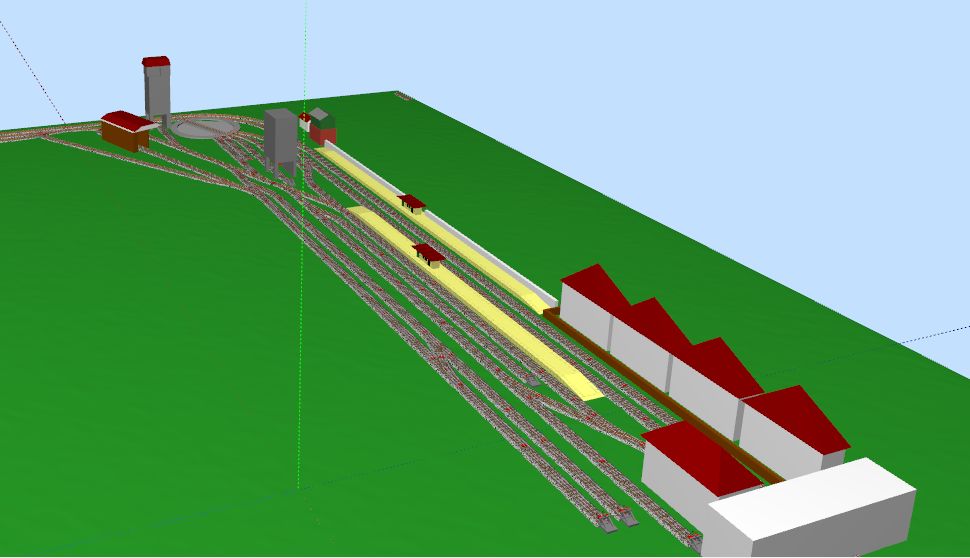
This is the very latest diagram of the layout. Two more sidings down the left hand side of the mainline for storage/ I've got a breakdown crane and coach on the way as well!
This was the very latest diagram of the layout with all current changes in place including the oil refinery siding:
Before replacement of the right hand baseboard.
Here is the latest extension to the layout. A second mainline now completing a two road mainline around the room. This will mean widening the shelf using MDF board and rebuilding the bridge section across the doorway.
But it has now been updated as follows: removal of coach siding down the left-hand side. Three distinct areas of control and a proposed oil terminal in the top right hand corner. Click here to see how that develops
The position of several points makes it difficult to control the layout properly and so i am upgrading all mainline points to electric. This means a few additions to the control panel and some extra wiring. In researching switches for the points i came across the
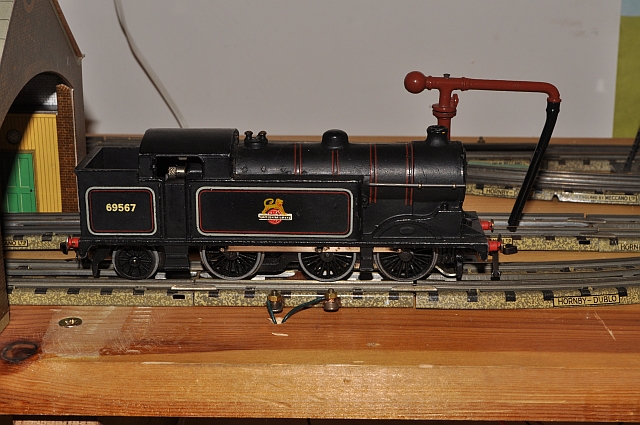
Latest acquisition is an 8F 2-8-0 freight loco. Bought on ebay with its original box. Once in the workshop though there were a couple of problems with it. The body has been touched up to remove the chips that seem to occur over time on these locos. As it has a tender pickup I was surprised to see that one of the pickups wasn't working. it seemed to have its spring missing. A single screw holds the body and chassis together and once opened it reveals the wiring from the pickups and the assembly of each pickup. The assembly is a simple collection of tubes rods and washers held together by pinching off the end of the plunger. Squeezing this back into shape allowed me to inspect the spring. Judging by the condition of everything here I was the first person to do this so I'm assuming it was faulty from new. The spring was compressed at one end which meant it wasn't long enough to do the job. merely stretching it solved this problem and when reassembled all was ok. The other issue was with the brushes, (one in particular was worn right down), and replacements have been ordered.
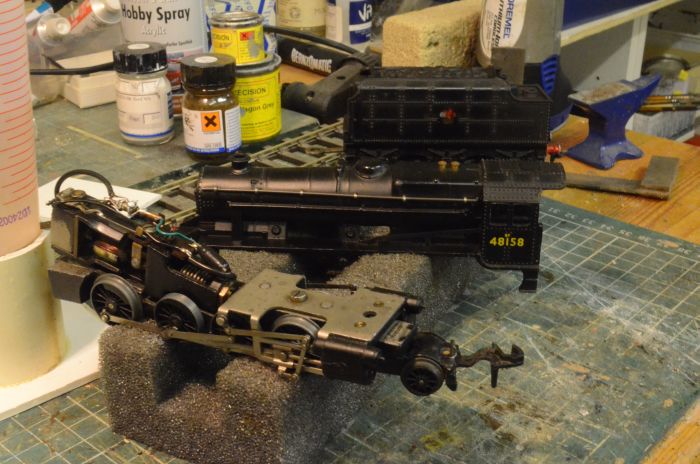
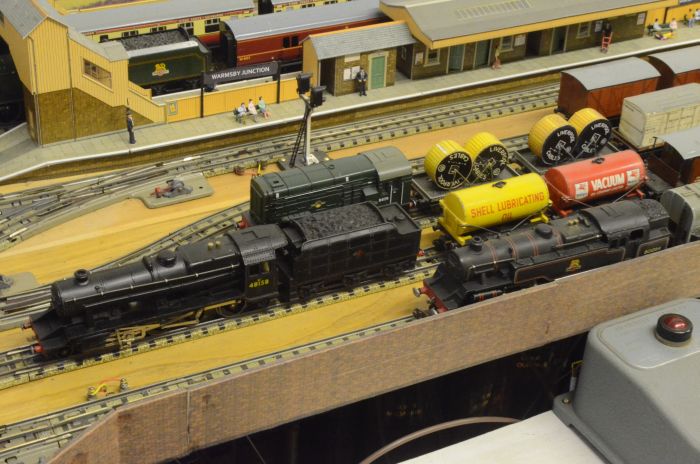
So the brushes of the 8F have been replaced and run in and a new magnet purchased to replace the almost non magnetic original magnet for the motor. I would recommend that they all be replaced as a matter of course as the magnets back in the 50s were created in a different way and tend to loose their strength of over time. Here it is insitu on the goods yard sidings.
A third controller is now in place to control the goods yard. A C3 which runs off the A3. I use the 'C' sockets on the A3 to power it and the signals on the layout. This gives me more options for running a mixture of trains around the room.
 The
story of how I started this is set out below.
The
story of how I started this is set out below.
It started with a goods train set in original box, just as it was back in the 50s. It worked straight out of the box and I was on my way. One 0-6-2 loco and a couple of wagons on a simple circuit. This was the second set I was given for Christmas.
Next purchase was an original Hornby controller, this one Type A2 with one controlled output. I replaced the power cable with a new one and tested the integrity of the transformer etc and all seemed ok. The bulb was missing but it worked. Everything made in the 50s was made to last with cast bodies and tinplate framework.
Next acquisition was a passenger train set, The Duchess of Montrose, (the first set bought for me all those Christmases ago.)

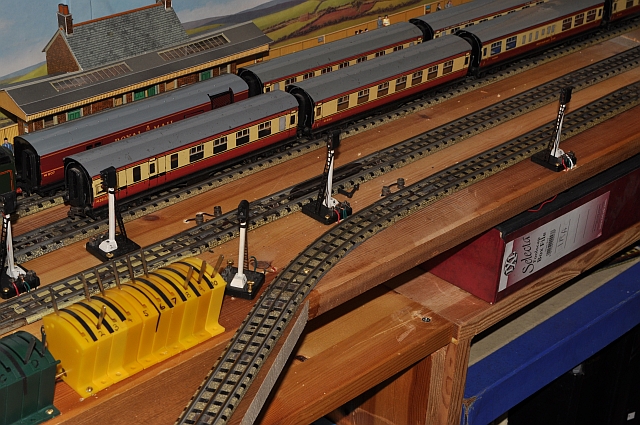
A large consignment of track: straights, points, isolating pieces, buffers, green and yellow switches and an array of colour light signals both single and double, (some of the bulbs were blown but replacements are readily available).
Next a diesel locomotive of the Bo-Bo kind and I now had all the locos bought for me when I was around 6yrs old. One extra loco is the heavy goods 2-6-4 loco, and this is where the rot starts to set in.........!

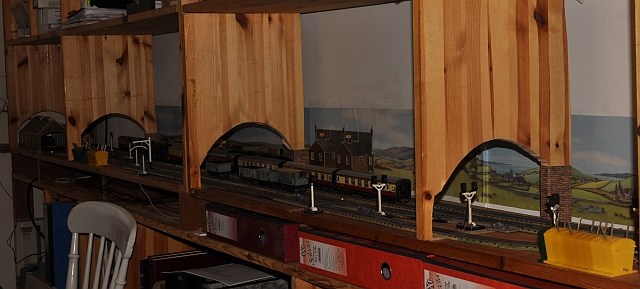
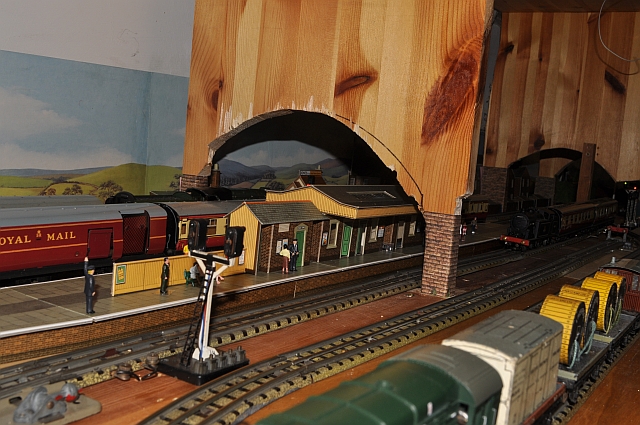
A signal box and level crossing completed my hoard of memorabilia. It runs around my workshop in one large loop of 20' x 12' with a station and goods yard complex in the bottom of my bookcase, (also 20' long). A small section is removable by the door so that folk can get in and out when its not in use.
A TPO set was obtained complete with original switch and TPO coach which now works as well as it ever did and a number of SuperQuick buildings, (station platform, engine shed and terrace backs) have arrived to be placed in strategic places and PECO backscenes complete the setup. I haven't screwed down the track or considered ballasting. I want to keep it simple and flexible. its what you might call a shelf railway!
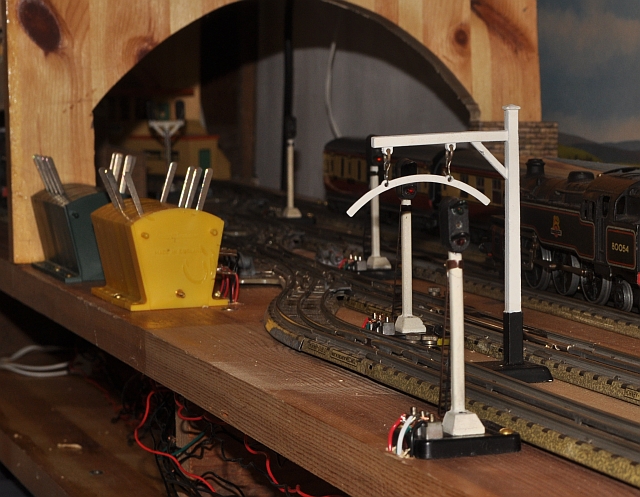
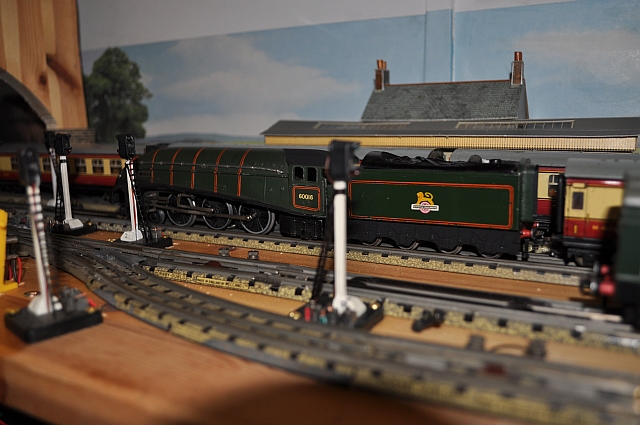
Colour Light Signals are populating the layout and causing all kinds of issues with my signalling expertise, (or lack of it).
Here is a YouTube video of the layout in action with my Duchess of Montrose:
To go with the Bo-Bo diesel I have obtained an original 3 rail 0-6-0 diesel chassis and covered it with a new Diesel Shunter body. Had to cut the skirts away and lengthen the front coupling, (which was broken anyway), and this is the result:
It runs really well now, so here it is in action:
To complete this model I have purchased a pair of ladders that will fit on the front end of the body. The holes for them are already there but they had to be got separately.
Ok, final acquisition of a loco the Silver King. Streamlined A4 loco. I picked this one up on ebay. Strangely enough it came with a tender that was of the glossy type, (the loco itself is matt), but even more interesting the tender had its body the wrong way round on its chassis.
Having righted the tender issues all seems ok now:
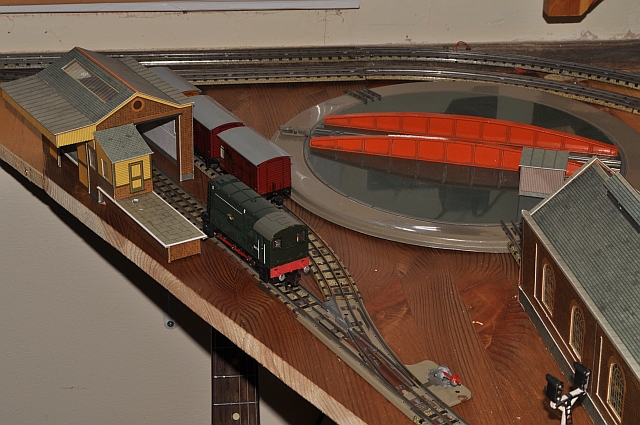
It make a strange intermittent noise when running but this was down to the armature being slightly loose. Adjusting the top bearing has cured it. The final part of this layout will include a turntable and this is on order, together with little bits of track to make it all fit together. More about that when it arrives in the next few days.
I have found the FREE program SCARM really useful in developing my layout. the track sections are accurate and the program is really easy to use.
IT shows the planning in 2D and 3D. Above is the 3D representation of the sidings in the bookcase. I have written a hints and tips document that can be accessed by clicking the image below.
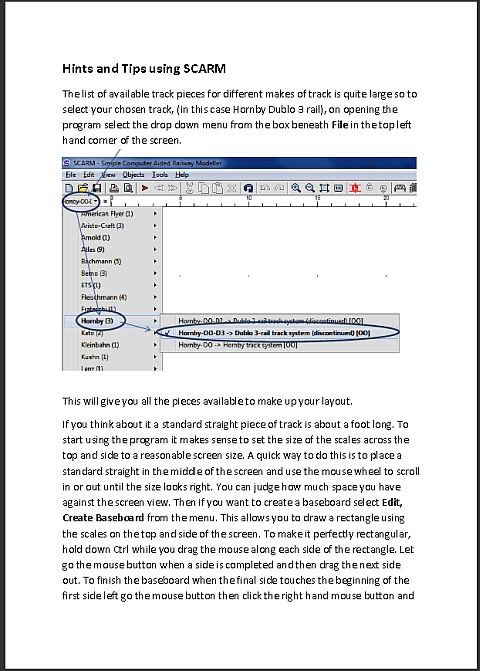
The SCARM software is available from: http://www.scarm.info/index_en.html
The really last item for this layout is the Turntable. I managed to find one at www.bishoptrains.com after failing to win one on eBay
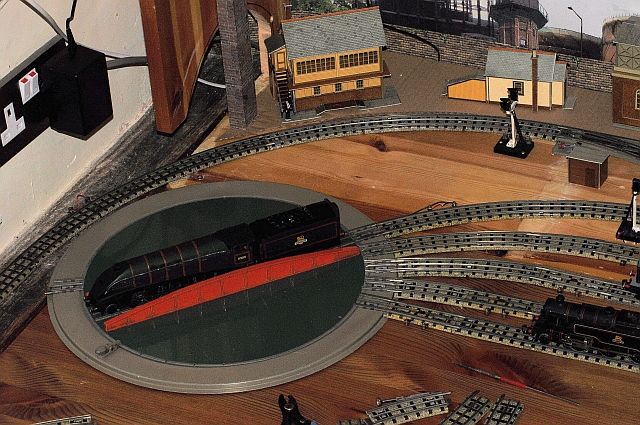
As the main rail in has its own feed it only remained to power the centre rail of the turntable to give power to each offshoot rail. This i did by soldering a connecting wire to the centre rail underneath the turntable and hey presto all exits are powered when the table is facing them.
This end of the layout is due for an upgrade. I need a couple of sidings for shunting duties and at the other end of this part its getting congested. So here is a start.
I removed a point from here to create a spur and allow access from the shunting yard at the other end of the layout to this end. Goods will come in and exit from here.
This area will have four short sidings to allow for the make up of trains along the spur. I may consider widening the stretch where the spur is currently to allow for a loop, (space allowing!).
This is where we are now with no more space to give to this layout its about complete.
It skirts with a single loop. There are two goods yards. a sorting yard and reception departure siding.
So having said I've finished the layout and several more acquisitions later of trucks station platform and building, more points and track, it means that most of the signals are in the wrong place now or are the wrong type!! Hence this addendum.
I've extended the sidings and added in another line there to allow for more complicated shunting.
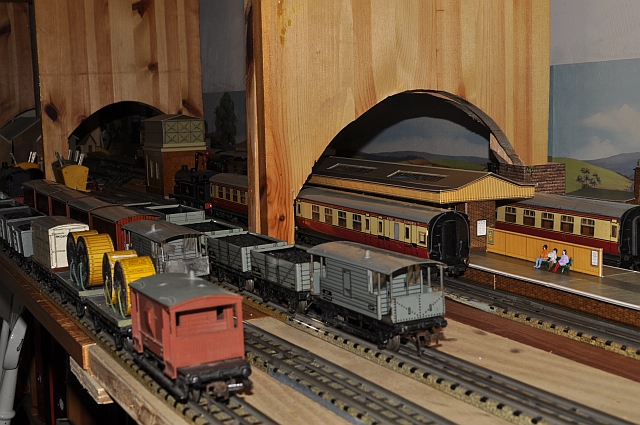
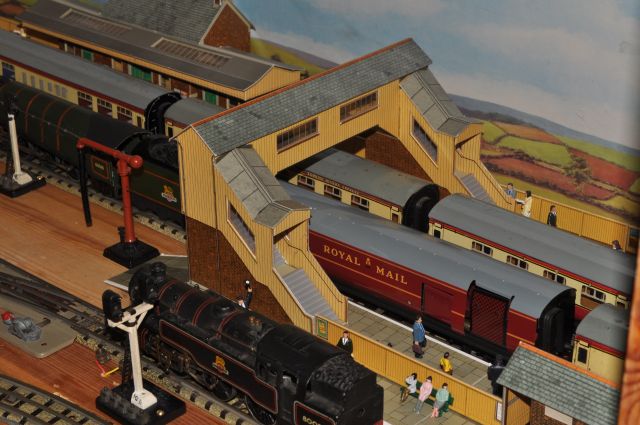
Also the down line in the station has been extended round the bend, (see the diagram), and a second platform and shelter has been made up from a Superquick kit which will provide three platforms, (two mainline and one suburban. Here are the up to date images:

The task now is to rewire all the signals. I only screw down the buffers as this keeps most of the track in place.
Here is a better view of the third platform with a suburban train just coming in. But what started out as a small bookshelf layout has now had several 'extensions' added to it to make a much more interesting layout.
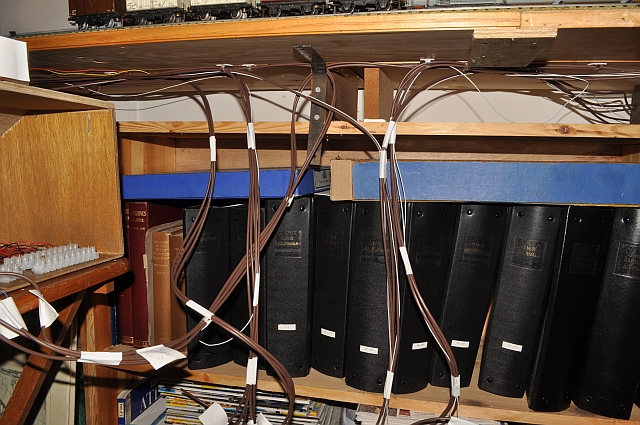
I started wiring this layout with several isolating sections, four power connections and numerous colour light signals. The result was a complete mess of wiring underneath the baseboards and switches grouped together in small clusters all over the place. A complete disaster and something had to be done about it. As I had modified the layout several times and changed areas to make them more interesting some parts of the baseboards were beginning to look more like a swiss cheese than anything else. The Hornby colour signals have an arrangement of sprung contacts for wiring and these i used initially. but i now find a much sweeter solution is to solder the wiring underneath. As you can see from the image above, no visible wires. Also i now use 4 core wiring looms as this keeps things easier to trace should anything go wrong! The pictures below tell the story.
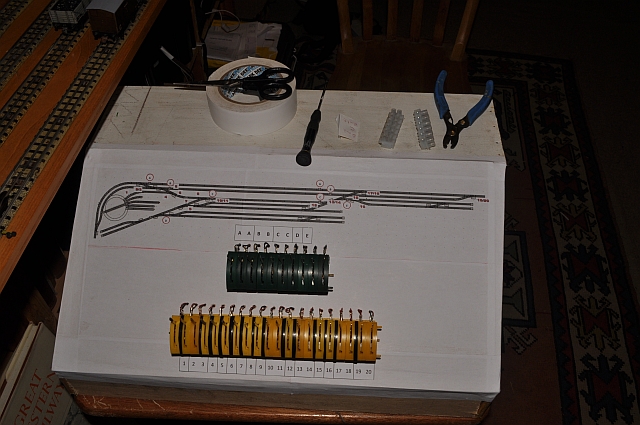
This is the new switch consul I built. The green switches activate isolating sections and the yellow switches the colour light signals. Above the switches is a plan of the station and sidings complex with numbers and letters to cross match with the switches. this consul is free standing and sits on a small table. How it connects to the layout is shown in the next two images.

The wiring is now contained inside the consul and connected as shown to the layout. here I have put all the isolating switches together with their correct sections of track.
The wires from the signals are grouped together in small batches. the white single cable is the common feed to the double lights, the single lights use the yellow cable in the 4 core cable. Keeping to a common colour code makes life a lot less tedius!
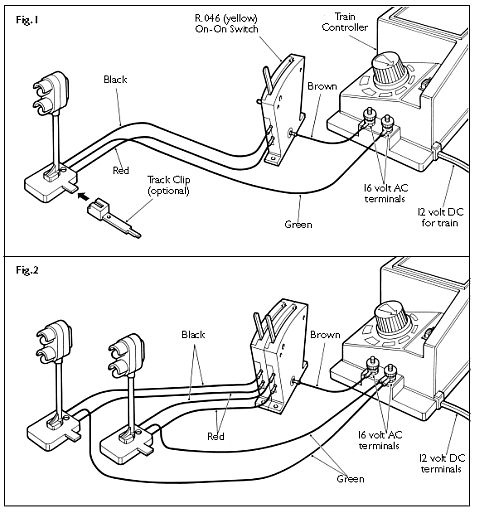
The essentials for wiring are taken from the Hornby help sheet part of which is shown below.
The control board is now finished.
I've added in extra isolation pieces to give more options for manoeuvrability.
The two top link locos now have Neo Magnets in them and what a difference it makes to their running. Both locos are much more powerful and when compared to the old magnets its not surprising!
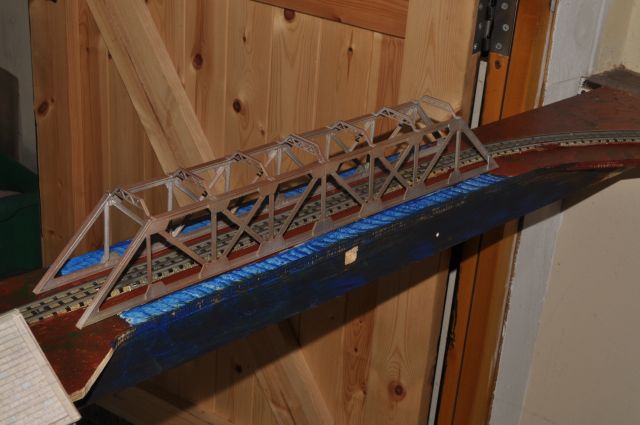
A couple of buildings and an improved crossing by the door are planned. The crossing will use a Dapol girder bridge, (or at least two of them). More of that later.
A footbridge to connect the two platforms together. Superquick models are still the best in my opinion. easy to make and look the part. here is the footbridge.
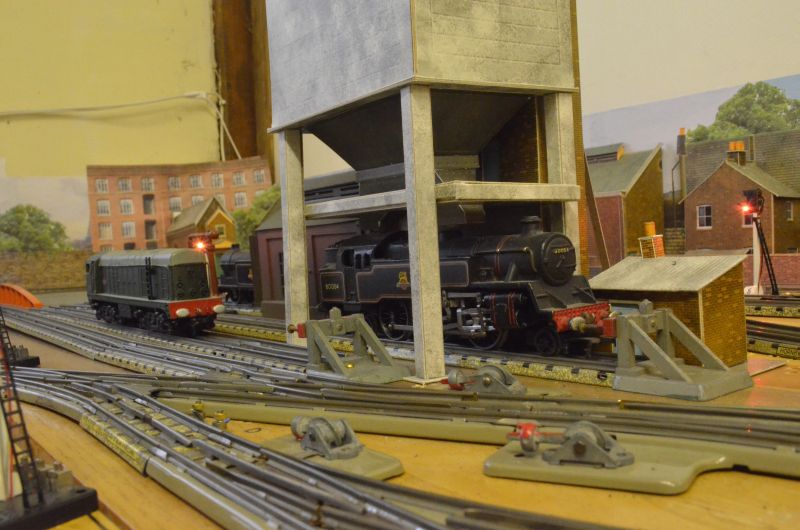
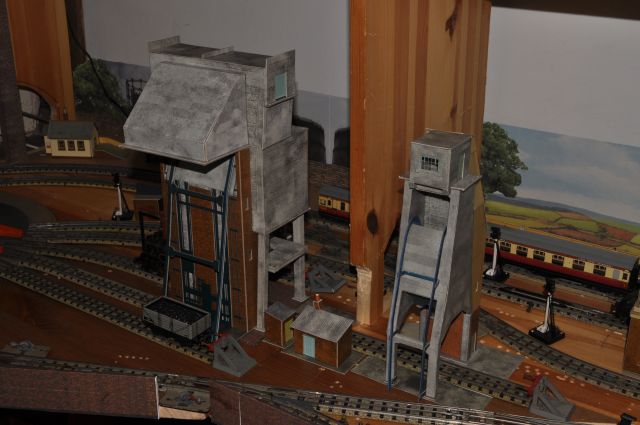
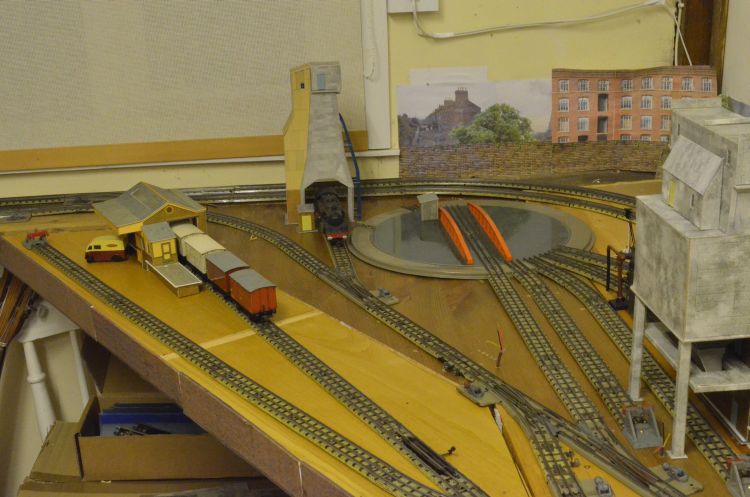
The two other buildings under construction are an ash plant and a coal stage. Both of which will go on a spur off the turntable.
The ash tower is a straight forward kit and makes up surprisingly well. The coaling tower is a little more involved but makes up just as well. Both kits come without railings which is a shame. here they are insitu:
Here is the girder bridge spanning the doorway:
Update on the layout.
Here you can see the remaining bookshelves have been removed when the layout was expanded.
Iut coach sidings in on the left hand side of the layout and a bThisto the right of the station.
Th over bridge was extended to take in three lines.
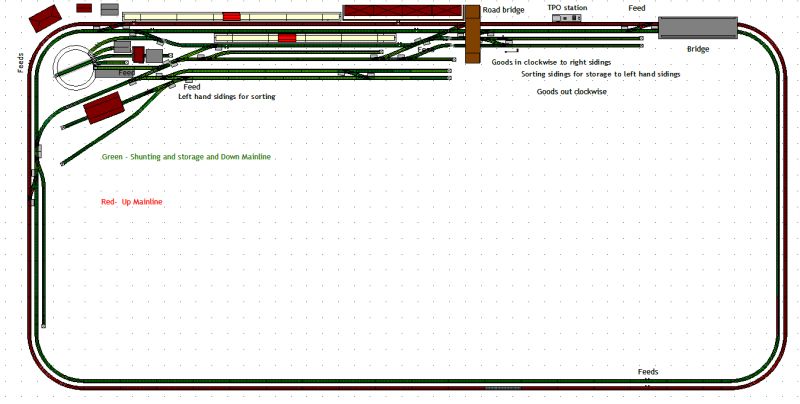
Here is the revised plan of the layout.
I have made another change to the turntable in that the bottom track that connects to it as seen from the plan above, (click on the plan for a larger view), which now connects to the main siding line. This enables locomotives to be turned on both mainlines whereas before a lot of 'fiddling' had to be done. Now if both mainline tracks are occupied its possible to change and alter direction of the locos that are there.
The A final change to the sidings. i have built two tracks, one to house the goods shed the other for storage etc. I have made this in the top left hand corner and given enough room to put vehicles etc, as in its previous position it was rail locked!
This is how it looks:
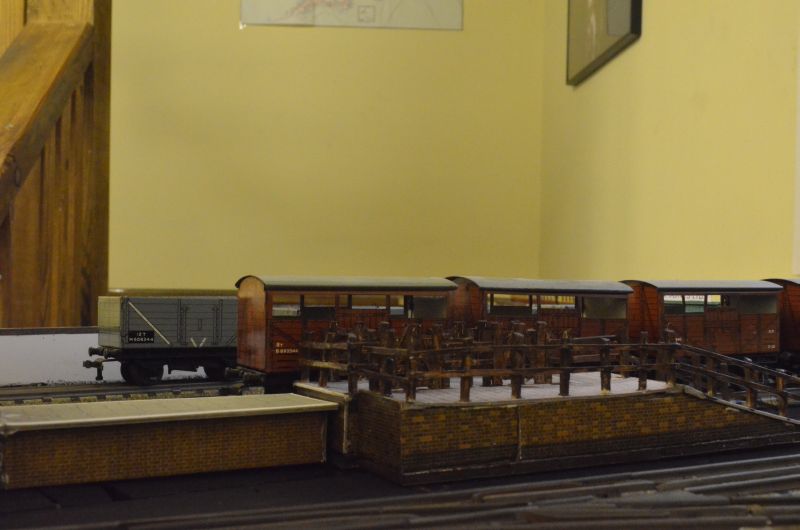
Having paid a little more attention to this area of the layout i now have a cattle dock in place as shown here:
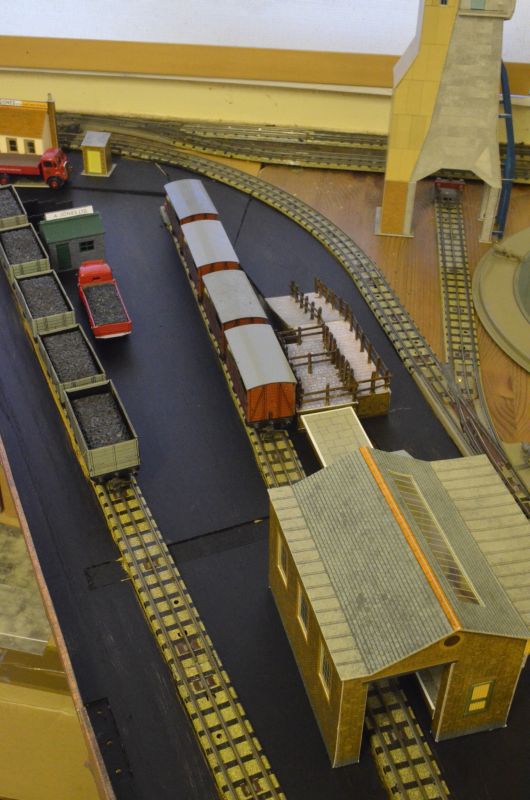
I'm not going to sculpt the ground but painted this area mars black as its a coal yard and cattle loading area. Here is another view of the cattle dock. I have several lorries on the way as well as a dozen cattle to occupy the pens.
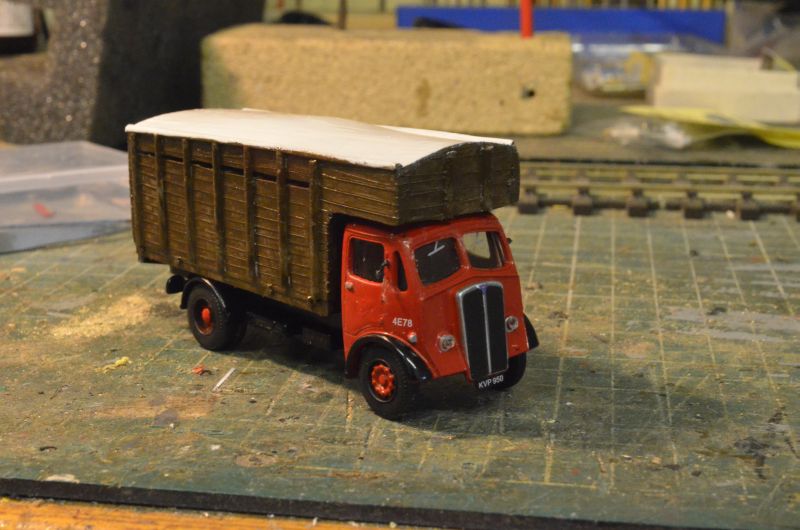
The item missing is of course a cattle lorry. Using a Base Toy AEC 4wheel Dropside - "BRS - Cheapside Birmingham Group" from hattons. I have created a cattle box.
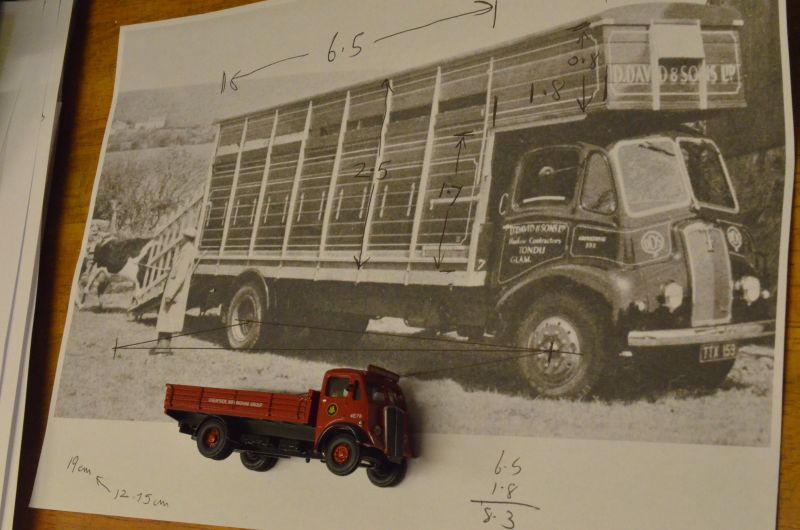
Having researched widely for a ready made vehicle there appears not to be any on the current market so I went about making up my own version.
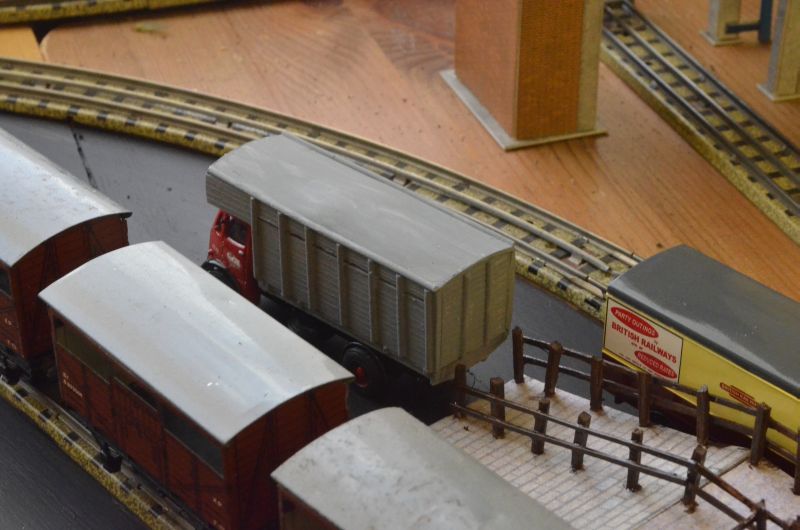
From the drawing and a Base toy lorry I was able to construct the new cattle lorry. The lorry had the back removed and its sides cut down to a single panel high. The head board was removed and discarded. The cattle body was made from plastic sheet from Slaters and narrow strip to finish it off. there is a slit on both sides 4 planks down from the top. Planks were made by scoring along the surface with a sharp knife. Here is the finished lorry.
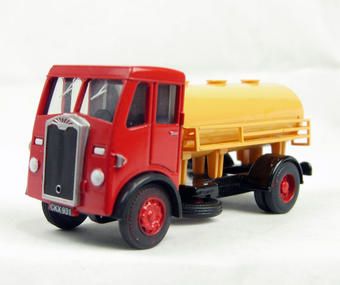
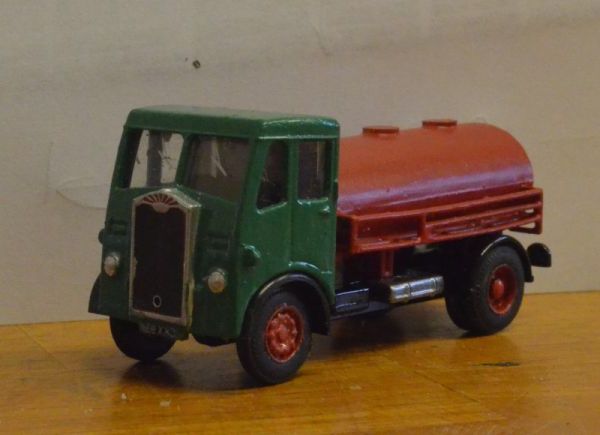
I also purchased two Base toys Albion tankers at £2.50 each from Hattons. They come with a red cab and a bright yellow plastic tank.
First the tank is set too high on the chassis as you can see here, but the retaining legs can be shaved off till the tank just touches the wheel arches. Then the cab can be dismantled by drilling out the plastic grommets in its base. The cab and tank are screwed onto the chassis and can be removed. to remove the cab first remove the front wheels, (just a pressed fit), and then the screw can be accessed. To remove the windows from the cab prise the windows down through the front windows. a sharp knife will cut into the plastic but wont be seen. Now you can paint each part to your liking without getting paint on the windows! Here are the component parts of two tankers.
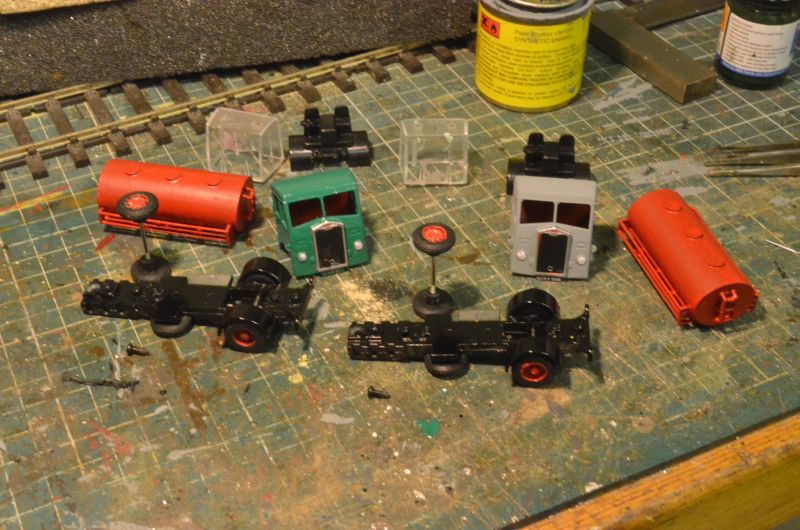
I have chosen red for the tankers and green for the cab. The cab on the right has an undercoat of grey. The tanks will need another coat of red.
Here is a finished tanker compare to the original:
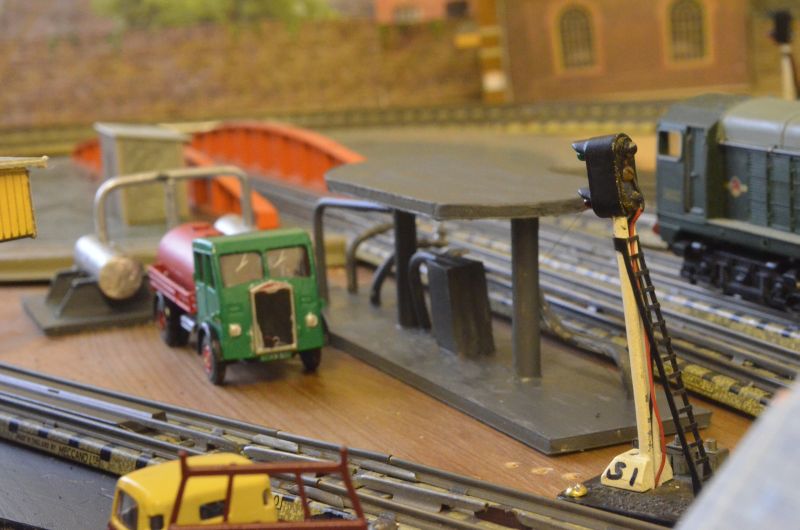
The final touch in that part of the layout was to put the tanker lorries to purposeful use. Therefore i constructed a simple diesel depot refuelling station as shown here. A bit of plastic pipe and some polyboard was the answer.
All changes completed to the track and buildings it now looks like this: